Admin guide
Note
Some drop-down menus only show a limited number of options. You can use the search function to filter for other options.
To apply settings, always click on “Update”, closing the dialog does not apply changes made.
Provider
In Admin/Providers, the settings for your own providers can be accessed via the cogwheel symbol.
-
Different persons/groups can be granted access to the provider under Access. This allows to view the provider's resources.
-
Under Provider Admins, select the people who are responsible for managing the provider and its resources
-
General information about the provider can be stored under Settings.
-
Both the text entered here under Short description and the description in the Information tab will be displayed later in the provider details.
-
For Allow organization to administer, TUDa as organization should always be selected.
-
-
Under Options, visible in the provider list for people with no access should be selected to make the provider publicly visible, and Enable billing should be selected for cost management
-
Terms of use can be stored under “Usage policy ”.
Resources
Resource Classes
OpenIRIS offers two different “Resource Classes ”:
- Scheduled: The most important class. It can be used to display equipment (e.g. research equipment or rooms) whose use is linked to bookings.
- Service: These can be offers of services from the provider, for example. This type can also be used to activate temporary access to resources.
Create resource
- Click on New resource in Admin/Resources.
- Enter the information required for creation and click on Create.
Note
- “Resource Class” is the only one that cannot be changed later
- Please do not create your own Resource Type. If there is no suitable type in the existing list, please contact us. The Resource Type will then be created for all providers. This avoids duplications in the filter settings, as Resource Type from different providers are not combined.
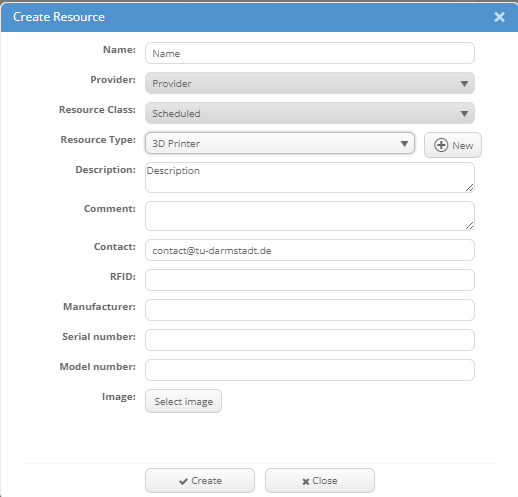
- The image that can be uploaded here or under “Settings”, must not exceed a maximum size of 25 kB!
Edit the settings of a resource
In the settings of the new resource (gear symbol), further options should be options should be set up
- under Access enable the desired usage group access.
-
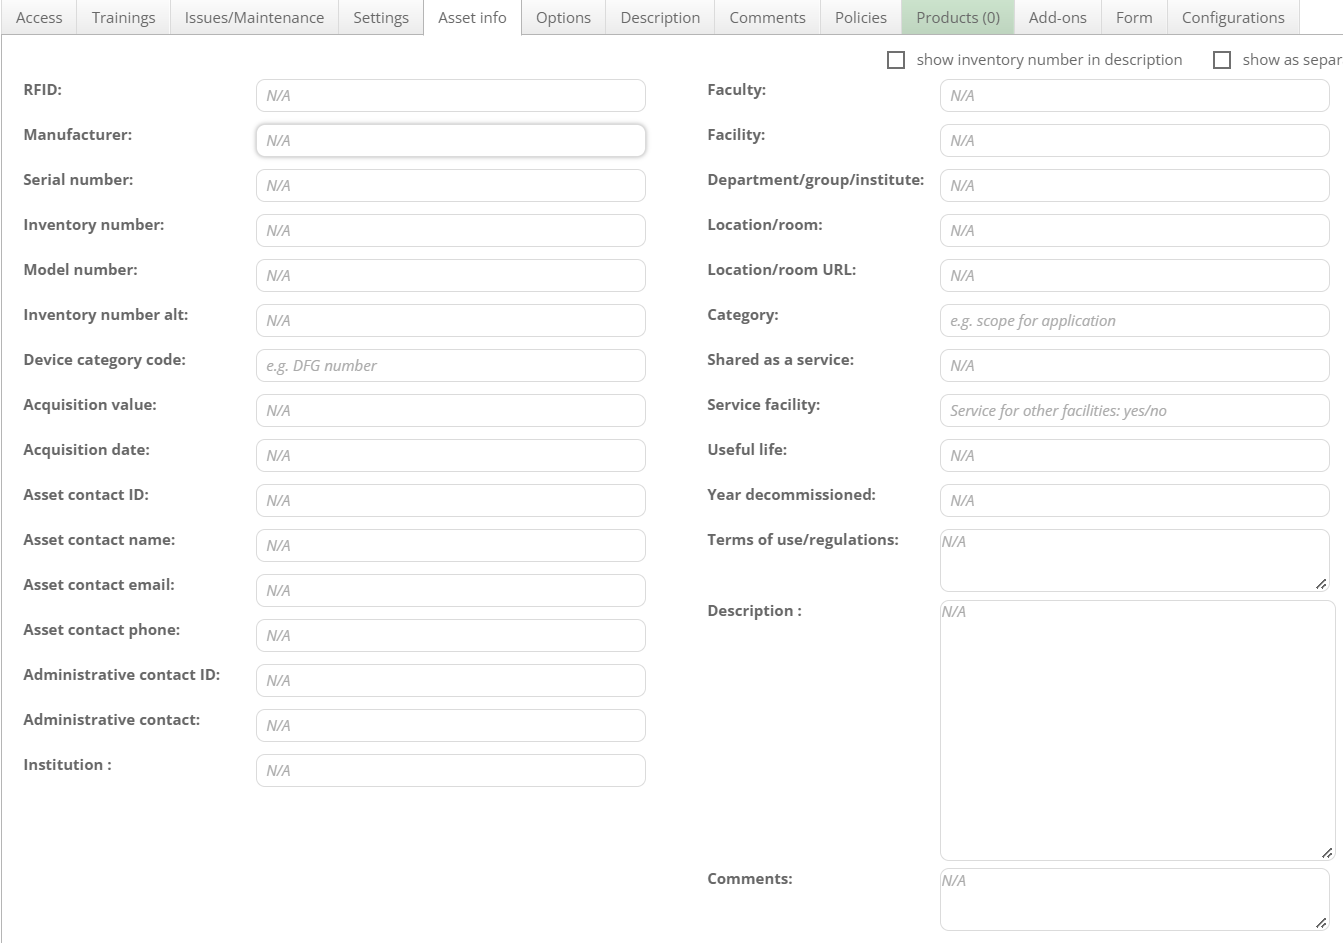
under “Asset Info please fill in these fields to enable a better assignment of the research device later:
-
Device category code: The appropriate DFG device code
-
Department/group/institute: Organizational unit that purchased the research device.
-
-
general information can be entered under “Settings ”
-
You can specify Resource admins who are to manage the resource instead of the Provider admins.
-
Here you can also specify whether a booking is Operator assisted, i.e. may only take place under supervision. It makes sense to activate calendar dispatch for a booking. If no operator is named, the provider admin is notified, who can subsequently select another person in the booking window.
-
-
the visibility of the device can be set as follows:
-
By default, the resource is visible to all users and groups listed in the Access tab of the provider settings. If TU Darmstadt is added here as an organization (which is the setting for providers that you have not created yourself), the resource is visible within the university after logging into the portal.
-
If the visibility is to be restricted to groups with direct access, the checkbox Visiblity must be checked under Options and Only visible with direct access to resource must be selected in the drop-down menu.
-
If the resource should also be visible without logging in, the check the “Public” box.
-
-
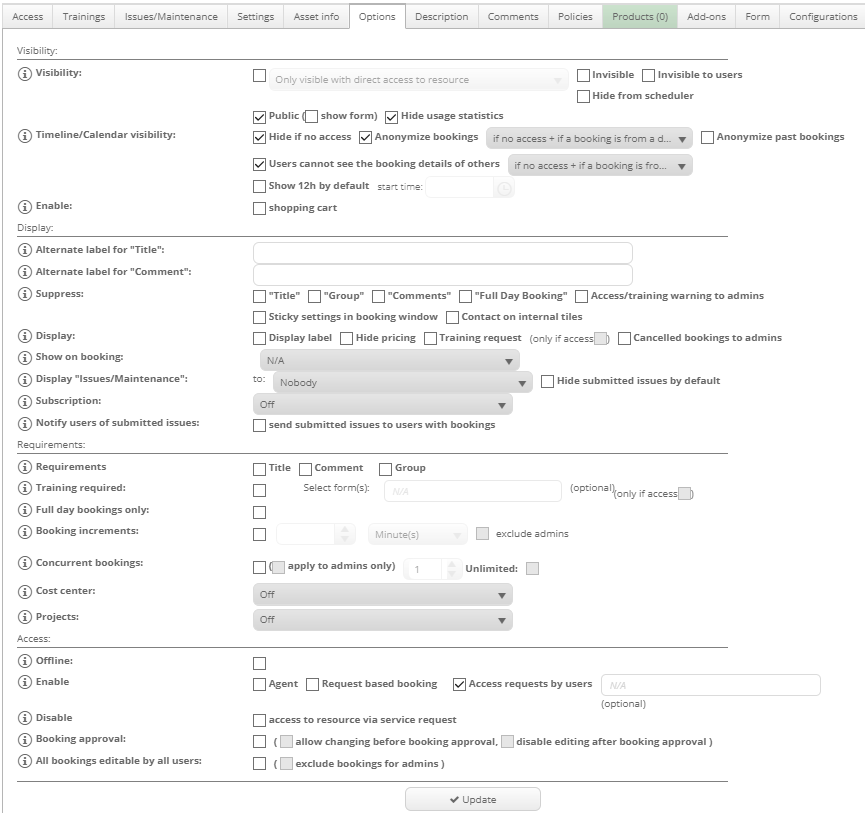
The following settings are also useful under Options: This allows people to request direct access to the device (if they can see the device), but apart from the general description they will not see any additional information. -
under Description and Comments, descriptions of the resource can be customized.
-
under Products “ products can be added.
-
under Add-ons, further bookable resources can be added that can be booked together with this device.
-
under Policies, all rules (booking and costs) that apply to this resource are listed and can also be deactivated there.
Booking rules
In addition to controlling access to a resource, requirements can be created that users must fulfill for successful bookings.
General booking restrictions
You can create various rules that define, for example, the maximum number of bookings a particular person can make.
-
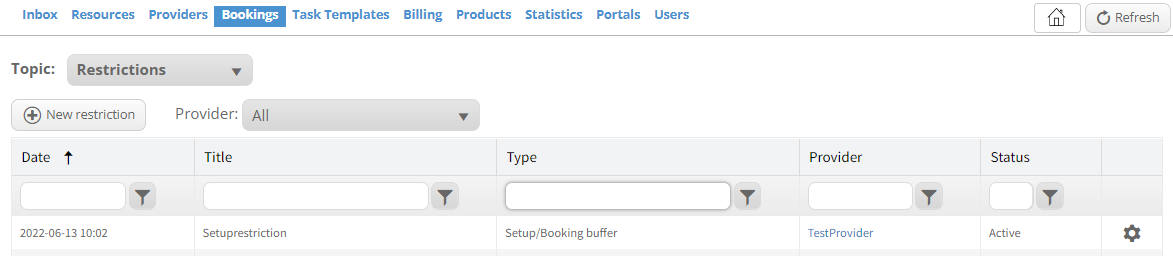
to get a list of existing restrictions or to create a new one select the topic Restrictions under Admin/Bookings.
-
a new restriction first requires a provider and a Restriction Type. The following types of restrictions are possible:
- Booking slot into the future: Defines how far into the future bookings can be made.
- Booking edit/deletion/cancellation policy: Defines whether and to what extent bookings may be changed.
- Booking slots*: Defines fixed blocks of time that may be used for bookings.
- Concurrent usage limit: Defines whether a device can be booked in parallel (this restriction can also be made directly in Options for a device)
- Disallow booking: Prevents people or usage groups from being able to book.
- Max and min duration of a slot: Defines the minimum and maximum duration of a booking.
- Recurring booking policy: Restricts the possibility of recurring bookings.
- Resource usage limit*: Sets quotas for persons and usage groups.
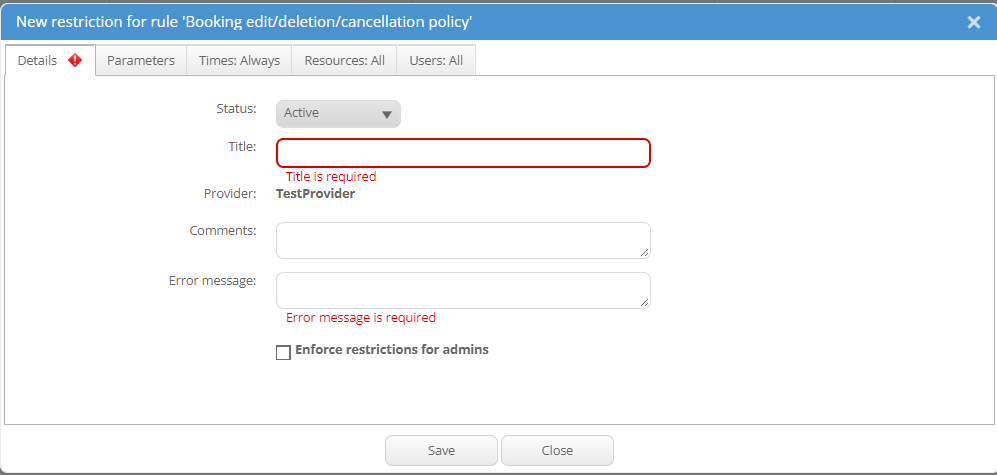
Setup/Booking buffer: If a device can be used in different modes, this can be used to define how long the period between the modes must be.
-
under Details you can define whether admins are excluded from these restrictions and specify an error text for invalid bookings.
-
under Parameters the settings of the corresponding restriction must be defined.
-
the other tabs define when, for which groups and which resources this restriction should apply.
Booking approval
These settings can be found in the device settings under Options in the Access section. If the check mark is set there, users without direct access to the device can make a booking that can be changed, accepted or rejected by admins.
Training
It is also possible to offer training for users with direct access to the resource. This can be mandatory as a prerequisite for subsequent bookings or optionally requested by users.
- For mandatory training, the Training required box must be checked in the device settings.
- Optional training courses can be activated by ticking the Training request box.
Users can be added to a training request by the admin in the Trainings tab or can create a training request themselves in Scheduler in the resource entry. The admin can block a date for this training request and add the participants to this date.
Users can use the resource once it has been carried out.
Products
Products are items that can be added in a certain number to the booking of a resource. can be added to the booking of a resource.
Create new product
-
open the window for creating under Admins/Products with New Product.
-
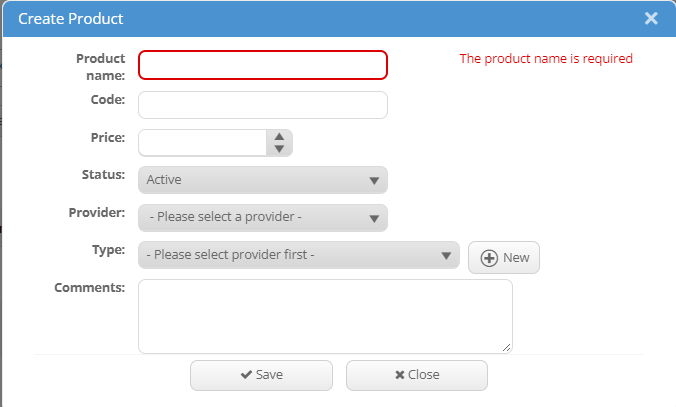 Enter the required entries Product name, Code, Price and the provider and finish with Save. Type is optional and serves no important purpose.
 -

A detailed description can be stored in the Information tab in the product settings (accessible via the cogwheel symbol), which is called up via the symbol (i).
Link resource to product
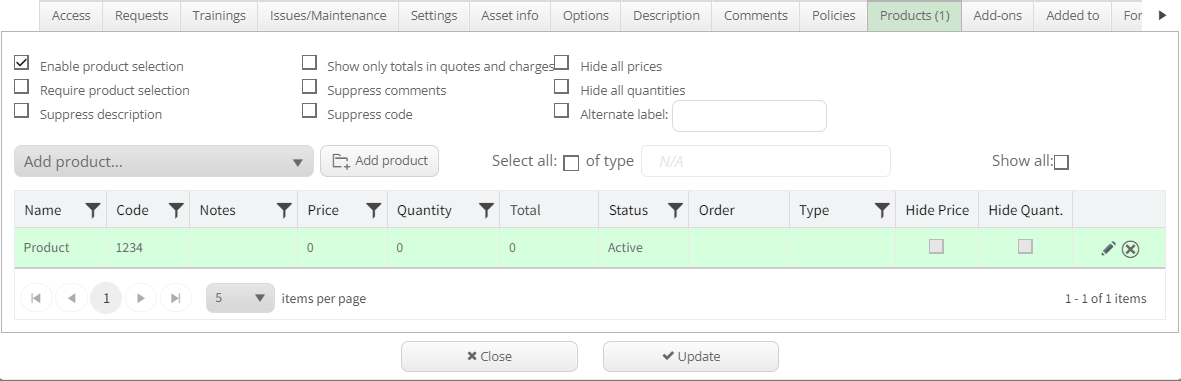
1. select Enable product selection under Products in the resource settings, if a product must be selected, also select Require product selection.
-

Select the desired element via the drop-down menu and add it via Add product. -
further options define which information/columns should be displayed during the booking.
Price management
The “Admin/Billing” tab contains all the options for pricing resources and managing costs incurred. If Billing is not listed, the option Enable billing must be activated in the provider settings under Options.
Create prices
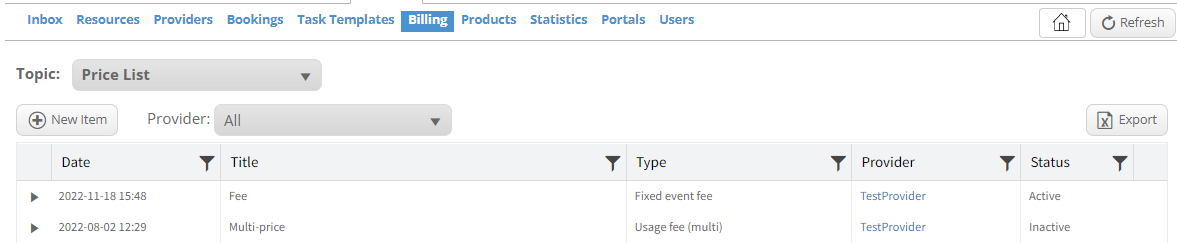
1. under Admin/Billing all existing price rules are displayed under the Price list element of the “Topic” drop-down menu.
-
to create a new rule, click on the New item button. In the window that opens, the provider and the type of rule must first be selected before further settings can be made in the next step.
-
the most important Pricing type is Usage fee (multi) to define hourly rates, discounts, basic prices, etc. for the various booking types. The rules can be restricted to certain groups, times and resources in the corresponding tabs.
-
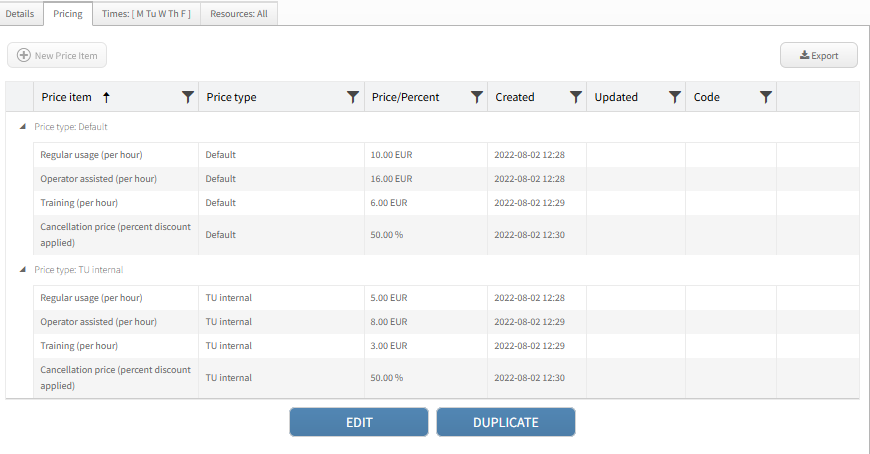
Several rules can be created at the same time. In the Pricing tab, hourly rates and cancellation fees can be created for the booking types Regular usage, Training, Operator assisted, and other options are also available.
These rules are applied to all by default. Rules for special groups (see image) are regulated via Price Types. A “default” value must exist for each entry before entries for other Price types can be created. -
in the Times and Resources tabs, the times and resources for which these rules are to apply are selected.
Price types

1. under Admin/Billing, the Price types element must be selected in the Topics drop-down menu.
- New price type opens a window in which the groups and persons groups and persons to whom this type should apply can be selected.